Plugin installation
1. Download the plugin
Download the Yamaha plugin file yamaha-eyeplusPlugin-version.zip here. It should contain a file named yamaha-eyeplusPlugin-version.all which contain one program file named COMMON.
1. Install the plugin on your robot
Unzip the file yamaha-eyeplusPlugin-version.zip and save the file yamaha-eyeplusPlugin-version.all on your PC.
Connect your Yamaha controller from RCX studio and import the EYE+ plugin into your robot application using the restore option
 . The extension must contain a program named COMMON.
Warning
If you already have a COMMON program in your application, do not overwrite your program with this one. Make sure you have saved yours elsewhere and mixed them into one file.
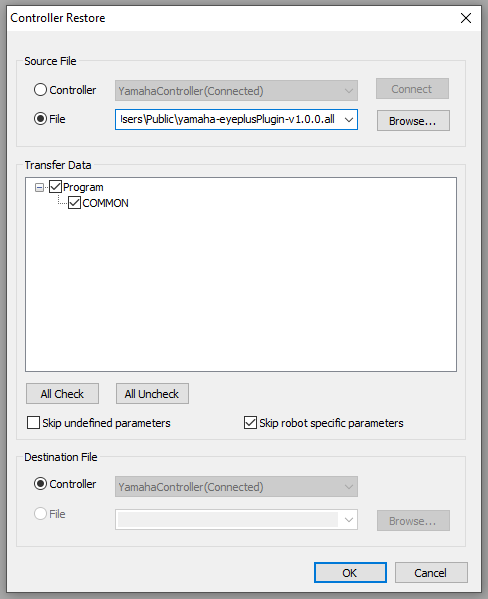
Fig. 1 Importe the plugin yamaha-eyeplusPlugin-version.all
Make sure that the COMMON program contains 7 public functions and 13 private functions. Only public functions should be called in your programs.
Public functions:
EYE_START_PRODUCTION
EYE_STOP
EYE_PREPARE_PART
EYE_GET_PART
EYE_RAW_COMMAND
EYE_CHECK_LAST_ERROR
EYE_CONFIGURE
Private functions:
EYE_READBUFFER1
EYE_READBUFFER2
EYE_INTERNAL_RAW1
EYE_INTERNAL_RAW2
EYE_TIMER
EYE_CHECK_IP
EYE_FIND
EYE_RAISE_ERROR
EYE_COORDINATES
EYE_SET_TIMEOUT
EYE_GET_TIMEOUT
EYE_CLEAR_BUFFER1
EYE_CLEAR_BUFFER2
3. Load the plugin in the controller
Once you have installed the plugin, you can transfer the plugin to the robot controller by clicking the  button.