Warning
You are reading an old version of this documentation. If you want up-to-date information, please have a look at 5.4 .Using four images
Here is presented the scenario used in the EYE+ hand-eye calibration wizard. In this scenario, the EYE+ should detect only one part per image and for each detected part, you should associate a robot position. Once this scenario is finished, you will get the coordinates of the part directly in the robot frame during production.
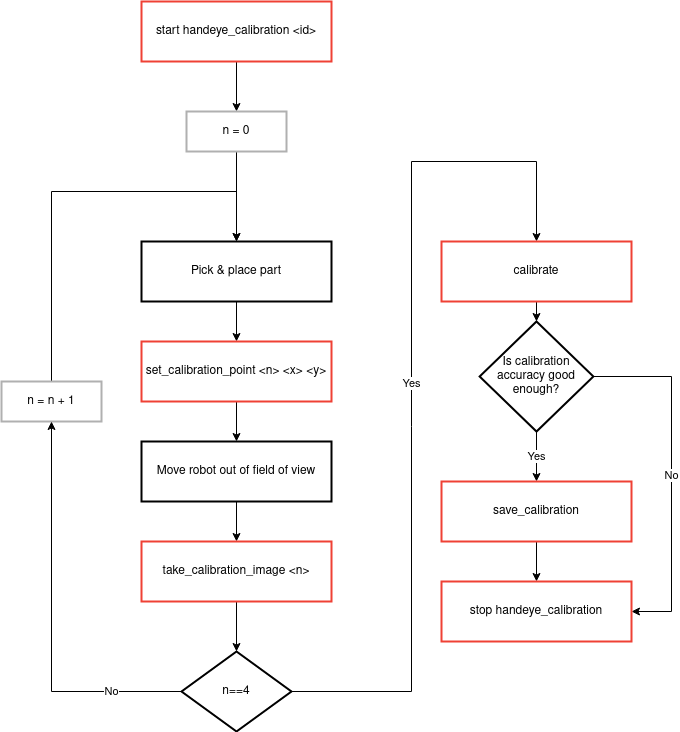
Fig. 210 Hand-eye calibration using four images
[start handeye_calibration <id>]: Start the hand-eye calibration state using the correct recipe identifier
<id>.
Start a loop of four iterations
[Pick & place part]: Pick a part and place it on the plate of the Asycube. When picking the part, make sure you pick it from the pick point defined in the selected recipe. The part must be placed in such a way that it can be detected by EYE+ in the next image analysis. A good practice is to place the part as close as possible to a corner of the Asycube and at each iteration in a different corner.
[set_calibration_point <n> <x> <y>]: Once you have placed the part, collect the actual coordinates of the robot and send them to EYE+ using the command set_calibration_point with the correct point number
<n>.[Move robot out of field of view]: Move the robot out of the field of view without moving the part.
[take_calibration_image <n>]: Call the take_calibration_image command with the same
<n>number used for the previous set_calibration_point command.
Once the loop is finished
[calibrate]: Call the calibrate command and check if the
calibration_accuracyis good enough for your production scenario. If it is not, you probably need to check the following things:Is the tool of your robot correctly defined?
Did you pick the part correctly?
Is your recipe precise enough?
Did the part move during the scenario?
Note
Good calibration accuracy depends on your needs. In most applications, a calibration accuracy of less than a millimeter is sufficient.
If you fail to pick your part too often during production, it means that your calibration is not accurate enough and you need to do a new one. Please refer to How can I increase hand-eye calibration accuracy? for more information.
Note
You can test the calibration using the command test_calibration.
[save_calibration]: Save the hand-eye calibration by using the command save_calibration.
[stop handeye_calibration]: To stop the hand-eye calibration state, call the command stop handeye_calibration.