Warning
You are reading an old version of this documentation. If you want up-to-date information, please have a look at 5.4 .Prepare part
The scenario with prepare_part is used to reduce the production cycle time of the basic scenario (get_part).
As soon as the part is picked and the robot has left the field of view of the camera, the command prepare_part can be sent (Fig. 203). It allows the system to start looking for new parts to store their coordinates in memory.
Tip
While executing the prepare_part command, you can for example place the last picked part or do whatever you need to do with your robot as long as it does not obstruct the camera view.
So when the get_part is sent, it is very likely that the parts are already prepared. If that is the case, the get_part command will directly get the coordinates of the part without vibrating the Asycube or taking an image.
It’s also possible to prepare and get multiple parts at once by changing the parameter part_quantity. By default, this parameter is set to 1. Refer to scenario Part quantity = <n> for more information.
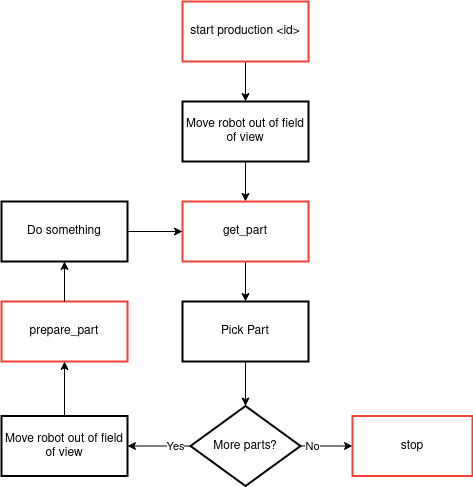
Fig. 203 Production scenario with prepare_part and get_part
[Move robot out of field of view]: Before calling the get_part command, you have to ensure that nothing obstructs the camera view.
[get_part]: Call the command get_part, it will either vibrate the Asycube and take a picture or send directly the coordinates of a part. In this scenario it is more likely that the parts are already found with the last command get_part.
[Pick part]: Pick the part.
[Move robot out of field of view]: Before calling the prepare_part command, you have to ensure that nothing obstructs the camera view.
[prepare_part]: Call the prepare_part command, it will either vibrate the Asycube and take a picture, or it will do nothing if the parts have already been found and stored in memory.
[Do something]: Place the part or do whatever you need to do with your robot. This robot action will work in parallel with step 5. For this reason, make sure that the robot does not enter the field of view of the camera during this action.
Start again from step 1. The cycle stops when EYE+ receives the command stop production.