Warning
You are reading an old version of this documentation. If you want up-to-date information, please have a look at 5.4 .Feeding Devices
Access the Feeding Devices configuration through and Feeding Devices.
This configuration page regroups the configuration for the Hopper and for the Asycube.
Hopper
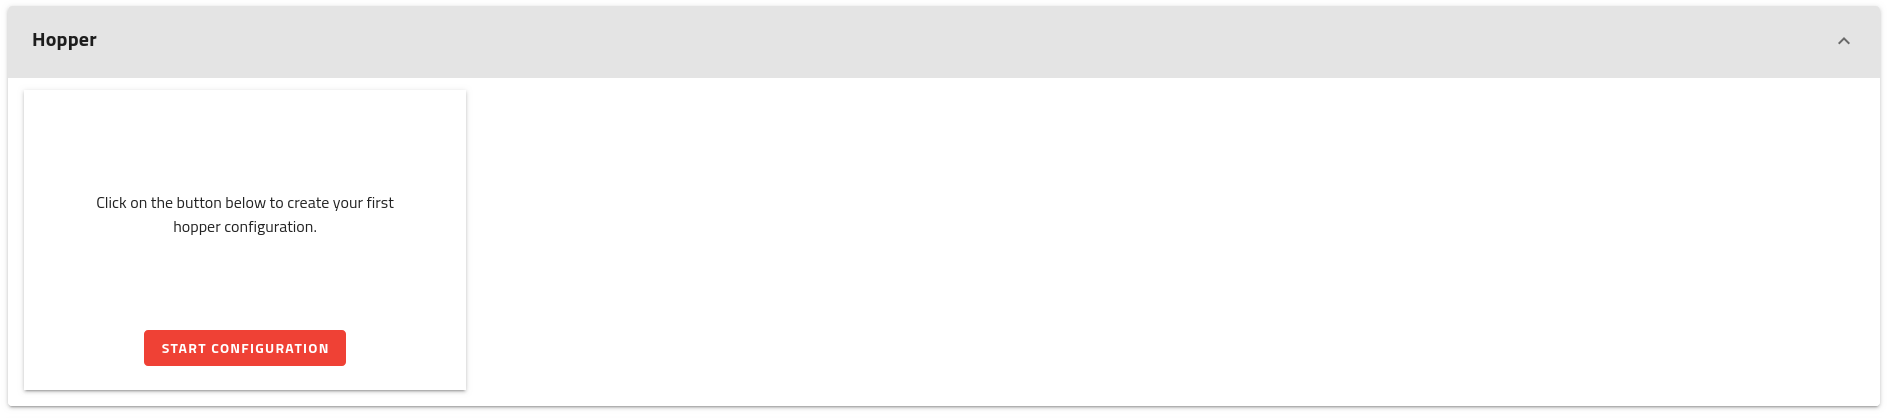
Fig. 194 Hopper configuration panel - No configuration
Note
This panel is not visible on Asycube 50 and 80 as they have an integrated hopper that is configured per-recipe (see Hopper Tuning for Asycube 50/80).
The hopper configuration panel allows you to create hopper configuration(s) that you will be able to select while creating recipes (Hopper Tuning for Asycube 240/380/530).
Tip
Most of the time, you will only need to create a single hopper configuration, but you can create up to 4 if you have multiple hoppers, for example in the case of Multi-feeding.
Once configured, the panel will display some information about the hoppers that will depend on the type of the hopper.
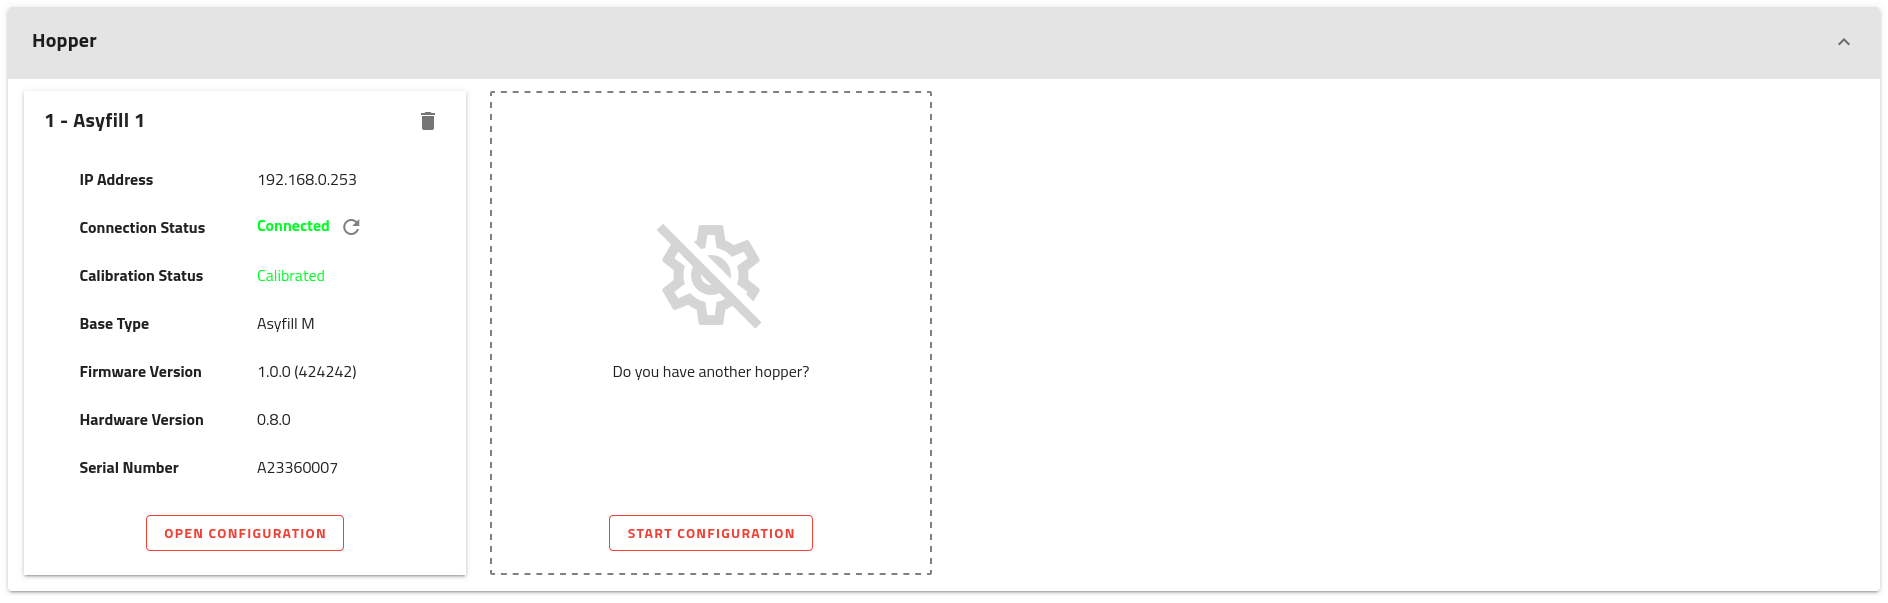
Fig. 195 Hopper configuration panel - Asyfill Smart Hopper configured

Fig. 196 Hopper configuration panel - Other feeding device configured
Important
You need to have at least one hopper configuration to create a complete EYE+ recipe that can be used in production.
Hopper configuration mini-wizard
To create or edit a configuration, click on or . This will open the hopper configuration mini-wizard.
Tip
At any time, you can click on the close icon on the top right to cancel the pending configuration and discard any changes but you must reach the end of the wizard to save and apply your changes.
The hopper configuration mini-wizard consists of several steps that will allow you to set your hopper up.
The first step is to select the type of hopper currently connected to your EYE+. This choice will change the actions to perform on the next steps as we handle Asyfill differently than other feeding devices.

Fig. 197 Step 1 - Hopper Type selection
You can choose between:
Asyfill configuration: Connect an Asyfill through TCP/IP communication.
Other feeding devices configuration: Connect a feeding device through analog or digital output.
Asyfill configuration
The Asyfill configuration is done in three steps :
Asyfill Connection
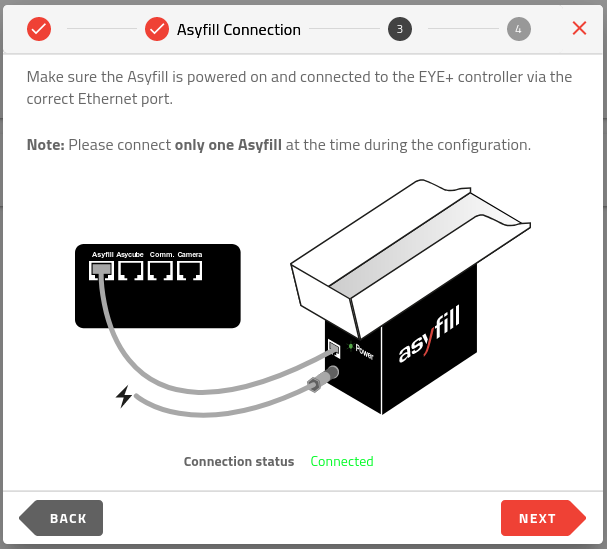
Fig. 198 Step 2 - Asyfill Connection
Power your Asyfill on and connect it to EYE+ Controller on the Asyfill Ethernet port. Connect only one Asyfill at the time during the configuration.
Note
If EYE+ cannot connect to the Asyfill, follow this quick troubleshooting guide:
Make sure only one Asyfill is connected to the EYE+ Controller and on the Asyfill Ethernet port.
Ensure your Asyfill is powered on.
Reset the Asyfill to the default IP address.
Verify that the Asyfill port of the EYE+ Controller is set to the default network settings (see General Ethernet Settings).
If that issue persists, contact our support team for assistance.
Tip
If you are using a EYE+ Controller with the Ethernet cover rev. 0, you can connect to the Robot port instead. However, make sure it is set to the default network settings (see General Ethernet Settings).
EYE+ Studio will automatically check for a connection each five seconds and once the connection has been established, the next step will be available.
Asyfill Calibration
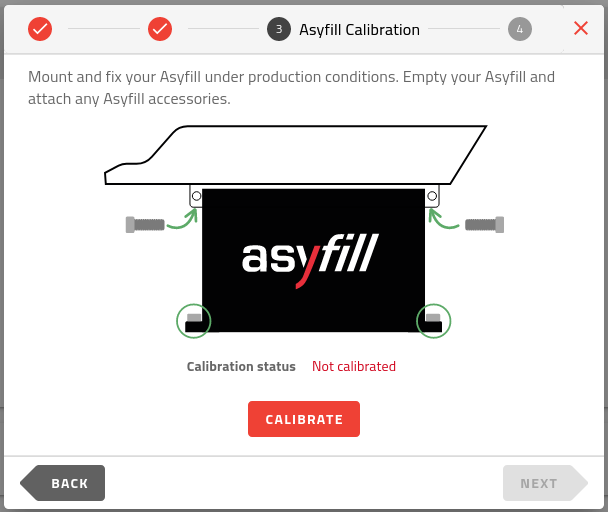
Fig. 199 Step 3 - Asyfill Calibration
The Asyfill must be calibrated before the first use. If the Asyfill has already been calibrated before, EYE+ Studio will detect it and allow direct access to the next step.
To perform the calibration, make sure your Asyfill is ready for the calibration as described in the Calibration procedure. Then, you can click on the button and wait for the calibration to complete.
Note
As the calibration can also be done using the Calib. button at the back on the Asyfill, EYE+ Studio will check each five seconds if the calibration has been done and if that is the case, the next step will be available.
Note
Re-calibration of the Asyfill is needed in several cases. Check Calibration procedure for details.
Asyfill IP Settings
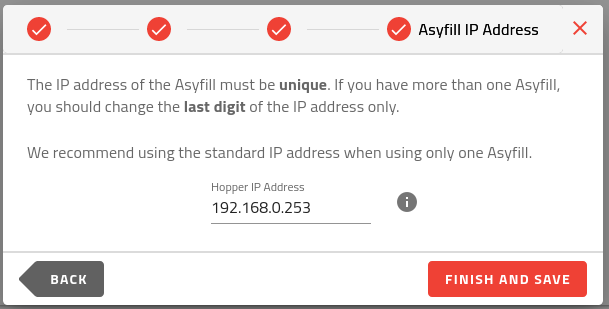
Fig. 200 Step 4 - Asyfill IP Settings
As it is possible to use multiple Asyfill on the same EYE+ Controller, usually when using Multi-feeding, the IP address of the Asyfill can be changed.
Important
We highly recommend not to change the IP address when using only one Asyfill as this causes unnecessary complexity.
Tip
If you have multiple Asyfill, give them unique IP addresses different from the default one, which is
192.168.0.253, for example 192.168.0.252, 192.168.0.251 or 192.168.0.250). Make sure to keep the same
subnet otherwise EYE+ will not be able to reconnect to the Asyfill.
If you do not need to change it or once you have chosen the new IP address, you can simply Finish and save the configuration.
Other feeding devices configuration
By other feeding devices, we mean any feeding device that is connected to the Asycube using the digital or analog outputs or on the EYE+ Controller using the GPIO cable, such as Standard hoppers.
The configuration is done in two steps :
Output Selection
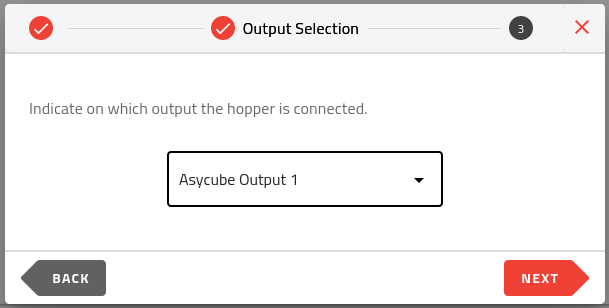
Fig. 201 Step 2 - Output Selection
On the output selection, you can indicate whether your device is connected to a GPIO or to an Asycube Output. Select your choice in the list and click on the button once done.
Output Type
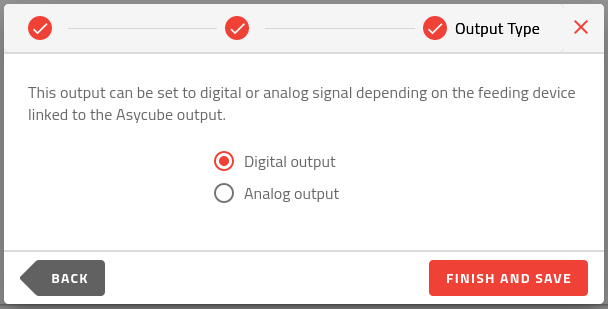
Fig. 202 Step 3 - Output Type
If you are using an Asycube output, you can choose whether the signal will be analog or digital.
Note
The GPIO can only be set to digital. If you need an analog signal, change the cabling to use the Asycube outputs instead.
Finish and save
When you are satisfied with your settings, you can click on the button that will save the changes in the EYE+ Controller.
You can now use your hopper configuration in the Hopper Tuning for Asycube 240/380/530.
Tip
If you have multiple hoppers connected to the EYE+ Controller you can restart the hopper configuration by clicking on the next .
Asycube
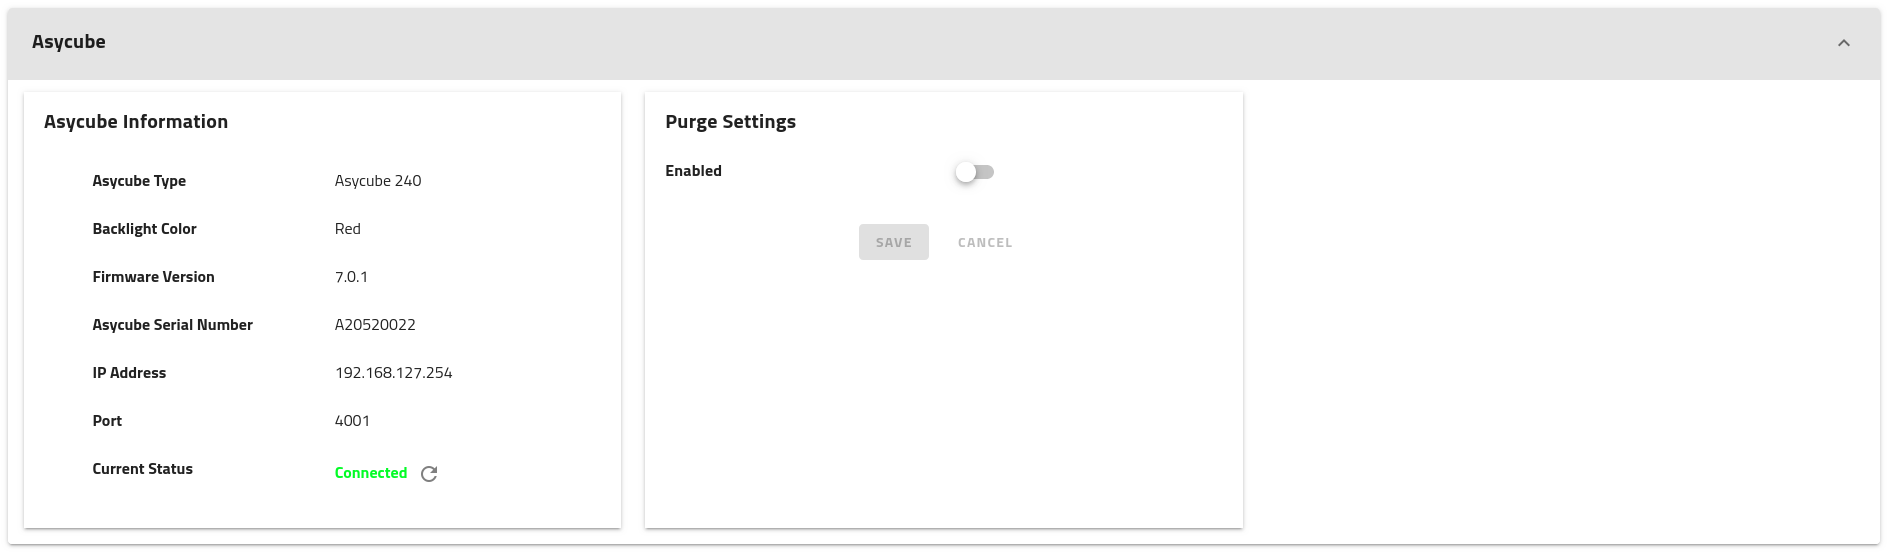
Fig. 203 Asycube configuration panel
The Asycube configuration panel provides information about the Asycube EYE+ has detected and allows its configuration.
Asycube Information
If your Asycube is correctly detected, the following information will be displayed:
Asycube Type: Size of the Asycube (50, 80, 240, 380 or 530)
Backlight Color: Color of the backlight (Green, Red, Blue, Infrared, Ultraviolet, White or No backlight)
Firmware Version: Firmware version installed on the Asycube
Asycube Serial Number: Serial Number of the Asycube (only for Asycube with Firmware >=7.0.0)
IP Address: 192.168.127.254
Port: 4001
Current status: Should be Connected. If not, refer to Asycube connection lost.
Important
Refer to Asycube connection lost if EYE+ is not able to connect to the Asycube.
Asycube Purge
In this section, you can enable the purge system and set whether the flap is on the right or left side of the platform. This parameter is critical as the system will use the corresponding Asycube vibration when purging.
Note
This feature requires an optional accessory (sold separately). Please refer to Asycube documentation on how to mount the purge system at Asycube purging platforms.
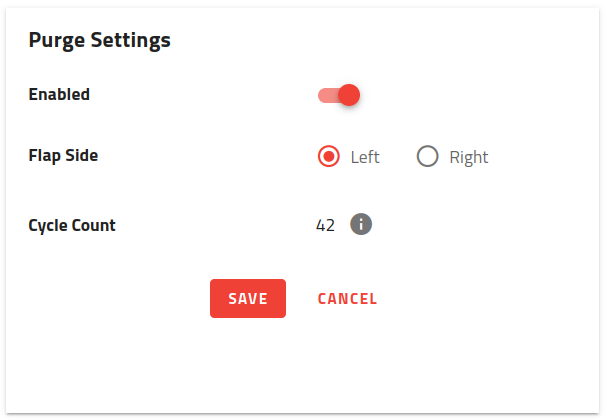
Fig. 204 Asycube purge settings once enabled
Important
You will also find the flap motor cycle count, defined as the number of open/close cycles the motor has performed since its installation. We recommend changing this motor after 20 000 cycles.
Asycube Type |
Firmware version |
|---|---|
Asycube 50/80 |
N/A |
Asycube 240 |
6.2.2+ |
Asycube 380 |
6.2.0+ |
Asycube 530 |
6.2.0+ |
Important
Should you need to uninstall the purging system from your Asycube, please remember to disable it.
Note
When executing a start production if the purging flap is detected as still open, EYE+ will try to close it first and will return an error codes if it cannot do so (non-functioning sensor, part stuck in the opening, faulty actuator…etc). You may face the same issue if you have uninstalled the purging system but not disabled it. Disable it first and try again.
Important
On Asycube 240, the purging system uses the second set of IO connectors, meaning a second hopper cannot be triggered through the Asycube directly when the purge is enabled. If you need to connect multiple hoppers, refer to the Hopper interface section for additional information.