警告
これは、古いバージョンのドキュメントです。 最新の情報をご覧になりたい場合は、次をご覧ください。 5.3 .4枚の画像を使用
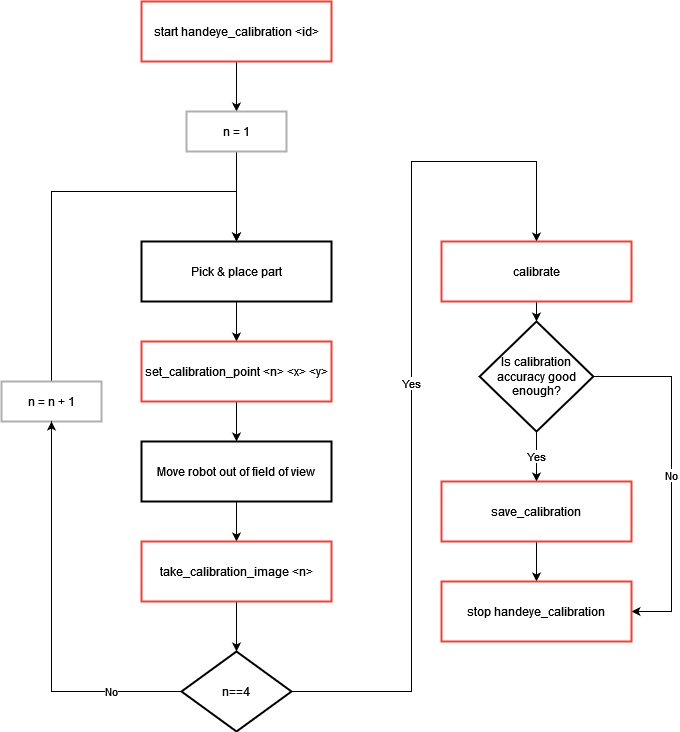
Here is presented the scenario used in the EYE+ hand-eye calibration wizard. In this scenario, the EYE+ should detect only one part per image and for each detected part, you should associate a robot position. Once this scenario is finished, you will get the coordinates of the part directly in the robot frame during production.

図 216 4枚の画像を使用してハンドアイキャリブレーション中
[start handeye_calibration <id>]: Start the hand-eye calibration state using the correct recipe identifier
<id>.
4回繰り返しのループを開始
[Pick & place part] 部品(ワーク)をピックして、アジキューブのプレート上に配置します。部品をピックする際には、選択したレシピで定義されたピックポイントからピックするようにしてください。部品は、次の画像解析で EYE+ で検出できるように配置する必要があります。アジキューブの角にできるだけ近い場所に部品を配置し、反復するたびに異なる角に配置するのが良い方法です。
[set_calibration_point <n> <x> <y>] 部品の配置が完了したら、ロボットの実際の座標を収集し、正しいポイント数字
<n>を指定して set_calibration_point コマンドを使用して EYE+ に送信します。[Move robot out of the field of view] 部品を動かさずにロボットを視野の外へ移動させます。
take_calibration_image <n>] take_calibration_image コマンドを、前回の set_calibration_point コマンドで使用したのと同じ
<n>を指定して呼び出します。
ループが終了すると
[calibrate] calibrate コマンドを呼び出して、
calibration_accuracyが自動運転シナリオに十分かどうかをチェックします。もしそうでなければ、おそらく下の項目を確認する必要があります。お客様のロボットのツールは正しく定義されていますか?
部品を正しくピックできましたか?
お客様のレシピの精度は十分ですか?
シナリオ中に部品が動きましたか?
注釈
キャリブレーション精度の良し悪しはお客様のニーズによります。ほとんどの用途では、1ミリ以下のキャリブレーション精度で十分です。
自動運転中に、あまりにも頻繁に部品を選べない場合は、キャリブレーション精度が十分でないことを意味し、新たにキャリブレーションを行う必要があります。詳しくは、 ハンドアイキャリブレーションの精度を高めるには? をご覧ください。
注釈
ハンドアイキャリブレーションは未実行( 図 174)
[save_calibration]: Save the hand-eye calibration by using the command save_calibration.
[stop handeye_calibration]: To stop the hand-eye calibration state, call the command stop handeye_calibration.